
Manually Sync a Schedule
This article explains how you can manually sync schedule transactions to Xero.
Instructions
1. Go to https://portal.heroblue.com.au/
2. Select the entity from the list by clicking on it.
3. Select the schedule you wish to sync from the list by clicking on it.
You need to have pre-configured the schedules Xero integration to perform a manual sync.
4. Down the right hand side of your schedule on each payment you will see a toggle, the toggle has different status as shown below.
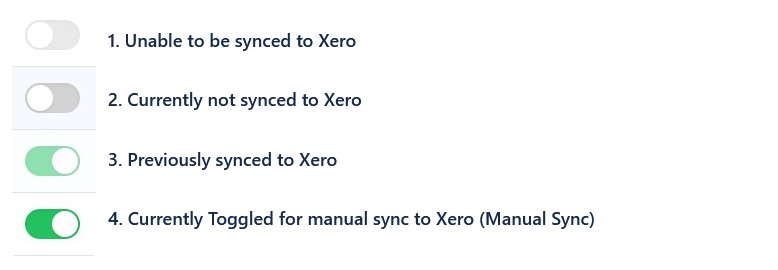
Option 1 - This usually implies that the transaction occurs in a lock period within your Xero file, please check your lock date before proceeding further.
Option 2 - Currently not synced to Xero, if this payment is in the future we would recommend putting Auto-sync on and letting Hero Blue sync this transaction as it occurs. Alternatively if it is in the past you may wish to toggle this to look like option 4 ready for manual sync to your Xero file.
Option 3 - This transaction has been previously synced to Xero. Currently the only way to remove this is you update your schedule and regenerate the whole schedule, which will remove all sync status back to option 1/2 depending on whether a lock period exists within Xero.
Option 4 - This transaction has been toggled for manual sync to Xero. To manually sync this transaction proceed to the top of the page and click the “Sync selected to Xero” button.